

The simple answer? In 3D, using the latest CAD (Computer Aided Design) tools. Designing a countertop using CAD software may seem complex, but let’s break it down into simple steps for basic consumers to understand:
- Gathering Information
The process begins with the designer gathering important information about your kitchen. This includes measurements of the existing countertop or the available space for a new countertop. They may also discuss your design preferences, desired materials, and any specific features you want to incorporate. - Creating a Digital Model
Using CAD software, the designer will create a digital model of your kitchen. They will input the measurements and layout details into the software to accurately represent your space. This virtual representation allows them to work on the countertop design without physically altering anything in your kitchen.
- Choosing Materials and Styles
Based on your preferences and the available options, the designer will help you choose the materials and styles for your countertop. They can show you various options through the CAD software, including different types of stones, colors, finishes, and edge profiles. This stage allows you to visualize how each choice will look in your kitchen.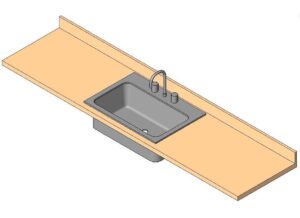
- Designing the Countertop
Using the CAD software’s design tools, the designer will start creating the countertop according to your specifications. They will consider the shape, size, and layout, ensuring it fits perfectly in your kitchen. The software allows them to experiment with different designs, such as curved edges, unique shapes, or integrated features like sinks or cooktops. - Visualizing the Design
Once the initial design is ready, the CAD software generates realistic 3D renderings of the countertop. These renderings provide a visual representation of how the finished countertop will look in your kitchen. You can see details like the chosen materials, colors, and overall aesthetics. This step helps you make informed decisions and ensure the design aligns with your vision. - Refining and Finalizing
At this stage, you have the opportunity to provide feedback and suggest any modifications to the design. The designer can make adjustments directly in the CAD software, refining the countertop to your preferences. This iterative process continues until you are completely satisfied with the design. - Production and Installation
Once the design is finalized, the CAD software generates precise specifications for the fabrication process. These specifications include the measurements, cuts, and other details required for manufacturing the countertop. The designer may also create a detailed layout plan to optimize the material usage and minimize waste. Then, the fabrication team uses these specifications to bring the design to life, cutting and shaping the chosen materials accordingly. Finally, the countertop is installed in your kitchen, completing the process.
By utilizing CAD software, countertop designers can provide you with a visual representation of your future countertop, allowing you to actively participate in the design process. This technology ensures accuracy, customization, and efficient communication, resulting in a countertop that meets your preferences and fits perfectly into your kitchen.